Material
Material
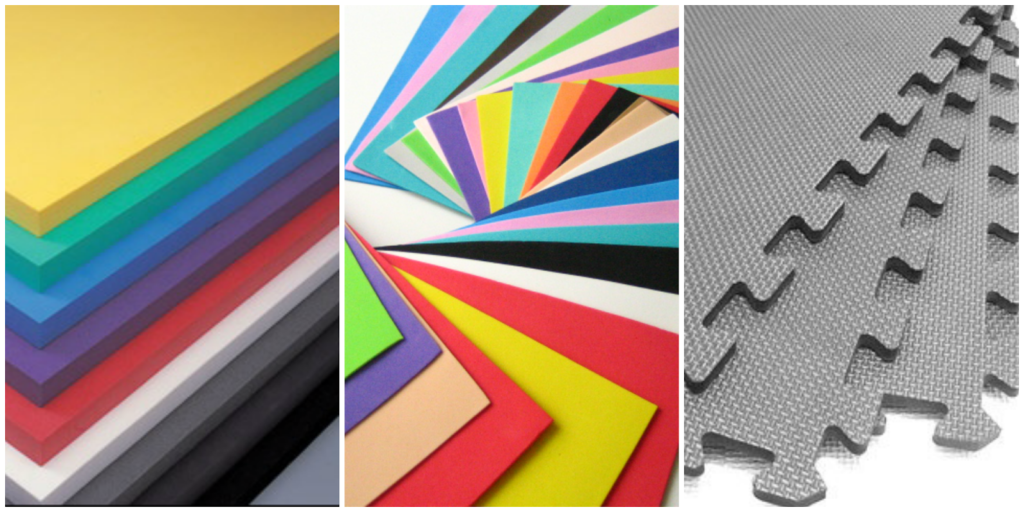
This material is called Ethylene-vinyl acetate (EVA), it is similar to a thermoplastic and it is very soft and flexible. Ideal to make light armor. You can find it in different thicknesses and shapes. You can usually buy 3mm foam, called craft foam, in paper shops or art shops very cheap (1€ or less for a very big sheet). Thicker foam can be found on the mats you use for camping (4 – 5 € a mat) and even thicker and harder mats for kids use this material (10 – 12 € for 6 puzzle mats). The best characteristic of this material is that it can be molded with heat and it keeps the shape! (it has its limitations tho) the bad news is that any marks and indents will probably stay there if you are not carefull while you wear it.
Este material se llama Etilvinacetato (EVA), es similar a un termoplástico y es muy blando y flexible. Ideal para hacer armaduras ligeras. Podéis encontrarlo de diferentes grosores y formas. Normalmente puedes comprar foam de 3mm o así, llamado goma EVA en librerias, tiendas de arte, y en los chinos muy barato (1€ o menos por una lámina muy grande). Podéis encontrar foam más grueso en las colchonetas que se usan para ir de acampada ( 3 – 4 € en Decathlon) e incluso más grueso y duro en los puzles para niños (10-12 € por 6 piezas). La mejor característica de este material es que se puede moldear con calor y mantiene la forma! (Con sus limitaciones, claro) La mala notica es que cualquier marca o roce que le hagas con más o menos fuerza se puede quedar ahí si no tienes cuidado cuando lo llevas puesto.
.JPG) |
Pieces I used for the cross of my Vampire Kindred cosplay
Piezas que usé para la cruz de mi cosplay de Vampire Kindred |
Cutting
Corte
Congratulations, this material is very easy to cut. Usually I will make a pattern with paper and draw it directly on the foam. You can cut it with scissors or with a cutting knife (I strongly recommend this for small details and inner parts)
Felicidades, este material es muy fácil de cortar. Normalmente hago los patrones en papel y los dibujo diréctamente en foam. Puedes cortarlo con tijeras o con un cutter (yo recomiendo esto para los detalles y zonas que estén por dentro)
A useful trick is to mark the lines really hard with a pencil, that way you will get curved edges instead of sharp ones, try to cut your pieces on one go to get a better finish.
Un truco útil es marcar las líneas muy fuerte con un lápiz, de esa manera los bordes quedarán redondeados en vez de afilados, intentad cortar las piezas de una sóla pasada para que queden mejor
Another trick, sometimes you need several layers of foam to get a 3D effect, if that is so cut one piece and use that piece as a pattern you will minimize any possible slip of your scissors when you cut the first one (you can also cut both at the same time)
Otro truco, a veces se necesitan diferentes capas de foam para dar un efecto 3D, si es así cortad la primera pieza y usadla de patrón para la siguiente, de esa manera minimizaréis cualquier posible fallo que hayáis tenido con las tijeras cuando cortasteis la primera (también podéis cortar las dos piezas a la vez)
Shaping
Forma
As I said before you can shape foam with heat, for small pieces an iron works great but do be careful as the corners will roll up too much if you overdo it, for
black widow I used this technique to give the belt a convexe form, works great for corners you want to make smooother. You can’t use the iron directly over the foam or it will really melt, put a paper or a piece of fabric between them. My
black cat mask and the knee pads of my vampire are also shaped like that
Como dije antes podéis dar forma al foam con calor, para piezas pequeñas una plancha funciona muy bien pero tened cuidad porque las esquinas se enroscarán demasiado si os pasáis, para black widow usé este método para conseguir una forma convexa, funciona genial si quieres suavizar las esquinas de una armadura. No podéis usar la plancha directamente o derretiréis el foam de verdad, poned un papel o un trozo de tela en medio. Mi máscara de black cat y mis rodilleras de vampiro también están hechas así
I don’t have a heat gun, but my heater works as well, even a hair dryer could work for this but it would be a bit less comfy to use. Basically for this kind of sharp detail you just need to heat your foam and fold it, try to pinch it but be careful with the nails. Don’t worry about going hard on it as it opens again if you don’t glue it
No tengo pistola de calor pero mi radiador funciona igual de bien, os puede servir incluso el secador de pelo pero sería un poco más incómo de usar, Basicamente, para este tipo de detalle angulos tenéis que calentar el foam y doblarlo, intentad pellizcar el borde pero tened cuidado con las uñas. Nos os preocupéis en hacerlo con fuerza porque la goma EVA tiende a volver a su forma original hasta cierto punto si no la pegas a un sitio.

If your piece is really big you may consider putting wires inside appart from the heat in order to keep the shape. Here I glued a wire to the inside (bottom) and covered it with a ribbon to secure it (sorry no good pics, the ribbon is under)
Si vuestra pieza es bastante grande podéis considerar usar alambre por dentro además del calor para que mantenga la forma. Aquí le metí alambre por detrás (a la parte de abajo) y lo cubrí con un lazo para asegurarme de que no se despegaba (lo siento no tengo mejores fotos, la cinta está debajo)
Obviously you can use a base and mold your foam over it, this works best with round parts and polystyrene balls for example, with my
black cat mask I used my own face as base, the material gets cold quickly so you should be fine if you are careful and wait a couple of seconds after applying the heat. Little pieces under the foam will shape it.
Obviamente podéis usar una base para moldear vuestro foam sobre ella, funciona mejor en partes redondeadas y pegado a bolas de poliestireno por ejemplo, con mi máscara de black cat usé mi cara de base, el material enfría rápido y no deberíais tener problema si tenéis cuidado y esperáis un par de segundos a que se enfríe antes de usarlo. Pequeñas piezas bajo el foam le darán relieve.
If your shape is extreme you may need to make several cuts to get the proper shape, if you have further details on top these cuts won’t be noticeable (same as if you are very careful and clean when you glue it) Remember that small pieces are always easier to mold.
Si la forma es extrema puede que necesites hacer cortes para conseguir la forma deseada, si la armadura tiene detalles encima no se verán (y si eres muy cuidadoso y limpio al pegarlo tampoco). Recordad que las piezas pequeñas son siempre más fáciles de moldear.
Glueing
Pegado
The best glue you can use for foam silicon, you have cold silicon, which works great with foam but it needs time to dry. The other good option is hot glue, it dries very quickly but it has a problem, as it uses heat you need to be careful when you apply it as you can slightly bend the material or get uneven shapes if the glue dries too quickly. E6000 is always a good solution as it is very very strong and flexible but again dries slowly. Superglue is about the worst option, it isn’t elastic and it will probably crack, specially in edges, also, if you don’t get it right first time it creates a layer of glue that will be very difficult to reglue.
El mejor pegamento que podéis usar es la silicona líquida, funciona genial con el foam pero necesita tiempo para secar. La otra buena opción es la silicona caliente, se seca muy rápido pero tiene un problema, como usa calor podríais deformar la goma EVA si no tenéis cuidado o incluso se puede quedar una forma rara si se enfría muy rápido. El superglue es quizá la peor opción, no es elástico y probablemente se romperá, especialmente en las esquinas. Si no se pega la pieza bien a la primera os será casi imposible volver a pegarla porque crea una película de pegamento por encima del material que no se adhiere a nada más.
Detailing
Detalles
When you make armour you may need to do an edge to the foam, this can be done with 3D glue or fabric paint or also with hot glue. Obviously you can do drawings as well.
Cuando hacéis armaduras es posible que necesiteis hacerles un filo, esto se puede hacer con pintura o pegamento 3D o también con silicona caliente. Obviamente también podéis hacer dibujitos
An advantage of the foam is that you can sew it perfectly well, some rough details can be done like that, or you can also glue cord to it
Una ventaja del foam es que lo puedes coser fácilmente, algún detalle rústico lo puedes hacer así o también puedes pegarle cordón.
Foam is very soft, if you draw over it hard enough it will keep the shape, for thicker foam you can even use an exacto knife before for deeper cuts.
El foam es muy blando, si dibujáis sobre él lo suficientemente fuerte se quedará la forma, si usáis foam más grueso podéis incluso usar un cutter antes para que queden más profundas las marcas
If you want even deeper detail you can use a soldering iron and melt the foam, but do be careful! As the fumes are toxic (the material per se isn’t) The dremmel also works.
Si queréis detalles más profundos podéis usar un soldador para derretir el foam, pero tened cuidado! Los humos son tóxicos (el material en sí no) La dremmel también funciona.
In the next tutorials I’ll try to cover finishing touches, painting, patterning, attaching and transport 🙂
En los próximos tutoriales intentaré cubrir el acabado, pintado, la creación de patrones, los enganches y el transporte 🙂


