Before we start let’s face it. It is much easier to order a wig which is already curly. They will cost around the same as a straight wig and the curls will be perfect. However, there are several reasons why you may want to curl your own, for example, if you need tight curls on your wig or it has an odd shape or style. Therefore, you may need to learn how to make tight curls on your wig.
Also, there are other reasons. Maybe you detangled your curly wig just to realise it had lost its shape. Or maybe you just need to curl a part of your wig and keep the rest straight. No matter the reason, using the hot water method to curl your wig is not always an option as it takes too long to dry. Here comes your hair iron to the rescue.
How to curl your wig
Wigs are different from human hair so do not expect them to be as easy to style as your everyday look. Very often they will resist you, but with a bit of patience and the right tools you will manage to win the battle. Always make sure you have a heat resistant wig and try your iron on a hidden side before you start. I recommend you the wigs from Uniqso, as they are high quality and great to work with. You also get a discount if you enter the code ALICECOS and believe me, they make a difference from the cheap one I am using for this tutorial.
Getting ready
For my wig I decided to use a hot iron wand that came as an extension of my hot iron, they come in different sizes and you can make very different styles with them. Using a normal hot iron is a possibility but can prove more difficult and you will get bigger curls than with a wand. Always use the lowest setting of your iron if possible. Curling your wig with hot water is also a possibility if you don’t have a wand, but you will have less control over it and you wig will need time to dry.


The easiest way to work with your wig is by using a wig head. Clamp it to your table or stick it to a pole that you can comfortably move. A wig stand is very inexpensive and will save you a lot of trouble and messing around.
First steps
In order to curl your wig you need to make sure that your hair is detangled and smooth. You also want your wig to be as straight as possible, you can use your straightener to do this or if you have time to let it dry use the hot water to straighten your wig method. Also, it is the time now to trim your wig if necessary.


Once the wig is prepared you will want to section it. You are going to be working with a strand at a time. Flat clips and bobby pins will be your best help here. Start by sectioning the bottom of your wig and clamp the rest away in a not too tidy bun.
A curl at a time
Grab a strand of hair at a time no bigger than the width of your iron wand circumference. Comb it again until it is completely smooth. This step is crucial for a perfect mess free curl. You will start by heating your strand of hair sliding the iron and straightening the fibers once or twice.


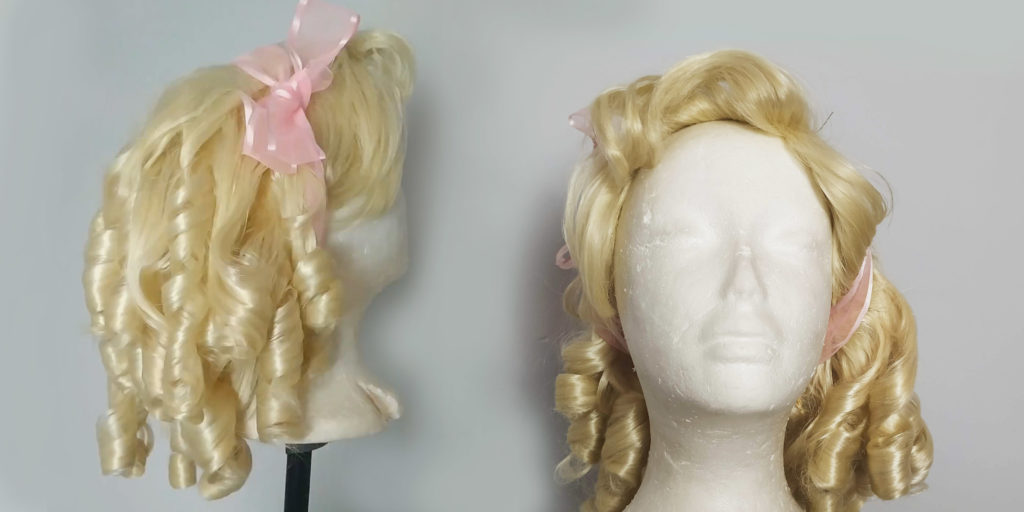
Then, position your hair half way the length on your wand, start twisting slowly and opening the wand an inch at a time. Pull down till you reach the bottom and try to keep as much hair touching the wand as possible as you roll it up to your wig cap.


Hold your iron a few seconds and slowly release the hair. The trick here is to hold the curl in your hand for a minute to let it cool before you let go. Letting go will create a nice wave, however do not let go yet if you are aiming for a really tight curl.
Really tight curls
If you are aiming for really tight locks the best thing to do is to keep the locks in place with a flat clip. Bobby pins can be used but they may leave a mark on your hair and tangle more easily. Don’t be like me and get your supplies ready before you start.


Once your wig looks like an old lady’s at the hairdresser’s gently spray with strong hold hairspray all over the wig and let it dry. My favourite is got2b by Schwarzkopf. A fine layer will be enough. If you are in a hurry you can use the hairdryer in a low setting to speed up the process. And remember not to leave your iron on the wig for too long or it will finally melt.
Extra tips
I find my ringlets will keep their shape more easily if you use hairspray on each one just before you curl it. Also, if you make sure all the curls face the same way your wig will look tidier. Consider this specially for the fringe and locks surrounding your face.


It takes trial an error to get the curls right. If you are not happy or your curl didn’t stay as you wanted, straighten the fibers and start from the beginning. Also, you may need to tidy your curls to make sure they are all in the right direction. You will neeed to loosen them and place them properly after you take the pins away.


Finally, I use a net like the ones where you usually store your wigs to keep my ringlets from falling down while I store it. You can actually wear one of these to the con as long as it is a similar colour to your wig. They are hardly noticeable and will avoid tangles. You may get away detangling your curly wig if you are careful but keep in mind that you will need to repeat all the process if it gets too messy.

It is now time to practice those tight curls on you wig. If you are stuck for new ideas to sew, make sure you check my pattern collection. Also, if you liked this review and want to give me you support to keep me going consider supporting me on Ko-fi, it all goes to new projects and there is no subscription needed!